Sunday, October 26, 2008

Gluten Free Vegan Pumpkin Pie

I have never been much of a pie baker, so when I found out Emily's class was having pumpkin pie for their fall festival I was a little nervous. I went online looking for a recipe but I couldn't find one that had (or rather DIDN'T have) everything I needed. I did, however, find a fabulous vegan pumpkin pie filling at Vegan Spoonful . Ok, battle half over...now for the crust. This is a conglomeration of 3 different recipes plus my own experiences in gluten free baking. When you look at this recipe your first reaction may be "are all those flours really necessary?". In my opinion...yes. Each and every flour brings something special to the table:


RICE FLOUR adds body but is almost always gritty when used alone.


SORGHUM FLOUR looks and tastes the most like wheat but is very heavy.


POTATO STARCH lightens the blend, adds softness, and helps retain moisture.


SWEET RICE FLOUR adds pliability and is less gritty than normal rice flour, however too much will cause toughness.


TAPIOCA STARCH lightens the blend, binds and adds pliability, and helps baked goods to brown. If too much is used the product will be tough and sometimes doughy in the middle.


There are many more GF flours that I have not covered because they are not in this recipe, but I just wanted to add that high protein flours such as quinoa flour and bean flours help to hold the structure in cakes and such. If you have problems with your baked goods collapsing try adding a high protein flour, but in very small amounts as they have strong flavors.


One last note I also wanted to make is that I did find one recipe online that would have worked for us but it had a buckwheat crust and I don't have any buckwheat flour. It is one of the very few flours that I have never tried. If you are a fan of buckwheat then you may want to check out this pumpkin (there is also an apple) pie recipe at Mom's Food Allergy Diner .


CRUST:
1/3 c plus 1 T Chilled vegetable shortening
1/4 c Rice flour
1/4 c Sorghum flour
1/4 c Potato starch
1/8 c Sweet rice flour
1/8 c Tapioca starch
1 1/2 t Dry Ener-G egg replacer
1/4 t Salt
2 t Sugar
2 to 3 T Ice water

In a large bowl with a wire whisk blend all dry ingredients. Cut in vegetable shortening until particles are the size of small peas (most recipes say to use a pastry cutter or two knives, I actually use my whisk in a potato masher sort of way, alternating between stirring and mashing until the desired consistancy is reached). Sprinkle in water, 1 tablespoon at a time, tossing with fork until all flour is moistened and pastry dough holds together when shaped into a ball with hands (1 to 2 teaspoons additional water can be added if necessary). Shape into a disk and wrap in plastic wrap. Refrigerate for a few hours.

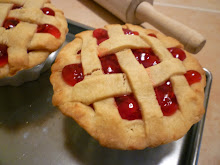
Place disk between 2 sheets of parchment paper. Roll pastry 2 inches larger than an inverted pie plate. Try to control the rolling pin and move from the center out. Don't use the rolling pin to go back and forth. You want the crust as evenly rolled as you can. Peel off top layer of parchment paper and lay pie dish over the dough. Flip over and allow the pie crust to sag into the dish. There may be a lot of patching required at this point, but the good news is that I found this dough to patch very easily. Roll the edges under and do the knuckle crimp around the top edge. If you are a novice like me this crimped edge instructional video may help. I have not had a need to use foil to prevent burning with this pie.


FILLING:
1 15-oz can pureed pumpkin
1 c Vanilla soy milk
3/4 c Sugar
3 T Cornstarch
1 t Cinnamon
1/2 t Ground ginger
1/8 t Ground nutmeg
1/8 t Ground cloves
1/2 t Salt

Combine canned pumpkin, soy milk, sugar, cornstarch, salt, and spices in a large bowl, and mix very well with an electric mixer, about 1 minute on medium speed (alternatively, you can combine these ingredients in a blender).

PIE:
Preheat oven to 350. Pour filling into unbaked pastry shell, and bake for about 60 minutes. The pie will still be jiggly when you take it out of the oven, but it will firm up as it cools. Cool completely on a cooling rack, cover with plastic wrap, and refrigerate for several hours or overnight before serving.

Thursday, October 16, 2008

Pumpkin Muffins With Pumpkin Seed Streusel Topping

It's October...what else would I post but a pumpkin recipe! These pumpkin muffins have no gluten, eggs, dairy, or nuts, and can be made free of soy by using safe oil and spectrum shortening instead of margarine. The streusel topping is sooo yummy...sweet, salty, spicy, and "nutty" (because they are not actually "nuts", they are seeds. You get it, right?)... I think I'll have to try this on some other things now... Ooooh it would be so good on top of apple crisp! ( you like all those dots? Yes, that's what it sounds like in my head, just one random thought running into another) Also, thank you to my daughter Amanda for yet another stunning picture. I truly appreciate your talent!

INGREDIENTS:
1/2 c Rice flour
1/2 c Sorghum flour
1/8 c Tapioca starch *
1/8 c Potato starch *
2 t Baking powder
1/2 t Baking soda
1/4 t Salt
1/2 t Cinnamon
1/2 t Nutmeg
1 c Canned pumpkin puree
1/2 c Brown sugar
1/4 c Oil
1/8 c Soy milk (or rice milk) *
1/8 c Applesauce *
1/2 t Guar gum (or xanthan gum)
1/2 t Vanilla extract

TOPPING:
1/8 c Margarine *
1/4 c Brown sugar
1/4 c Gluten free oats
1/4 c Shelled, roasted, salted pumpkin seeds (pepitas)
A dash of cinnamon and a dash of nutmeg
* If you don’t have an 1/8 cup measure, it is equal to 2 Tablespoons.

Preheat oven to 350. Pulse oats and pumpkin seeds in a blender or coffee/spice grinder, just enough to break them up a bit. Mix with the rest of the topping ingredients until combined and crumbly and set aside.

Sift or whisk together rice flour, sorghum flour, tapioca starch, potato starch, baking powder, baking soda, cinnamon, and nutmeg.

In a large mixing bowl stir together pumpkin, brown sugar, oil, soy milk, applesauce, vanilla, and guar gum. (If you are using xanthan gum add it to the dry ingredients, if you are using guar gum add it to the wet ingredients)

Add dry ingredients to wet and continue to stir until completely blended. Mixture will be very thick.

Put paper liners in muffin cups and fill cups 2/3 full with batter (it will be thick, like halfway between batter and cookie dough). Cover each muffin with topping and gently pat down so it will stick after the muffins are cooked.

Bake at 350 for approximately 25 minutes.

Friday, October 3, 2008

Super Simple Turkey Meatloaf

Yes this picture is my handywork. I just couldn't convince my daughter Amanda that she would rather stay home and take pictures of meatloaf than go to her homecoming game tonight. Nikki wasn't much help either. She's a vegetarian and thought the whole situation was disgusting. Emily wanted to help in the beginning. She suggested that we surround the meatloaf with Polly Pockets, but 20 minutes later when the meatloaf was done all she had to say was "would you hurry up and take that picture, I'm hungry!" So here it is, super simple, kid friendly, allergy friendly meatloaf, served in an old Kid's Cuisine container...just for fun. Dry mustard and garlic would also be welcome additions to this recipe and would have been in there if Emily could have them.

1 ¼ lbs Ground turkey
¼ c Seasoned gluten free bread crumbs http://yummyallergenfree.blogspot.com/2009/01/gluten-free-bread-crumbs.html
¼ c Allergen free instant mashed potato flakes (I used Barbara’s Bakery brand)*
½ t Onion powder
¼ t Salt
¼ t Pepper
1 T Worcestershire sauce (yes, Lea & Perrins is gluten free, it does, however, contain garlic)
½ c Ketchup

Preheat oven to 350 degrees. Put all ingredients except for ketchup into a bowl and mix until well combined. Press the mixture into a loaf pan and spread the ketchup evenly over the top. Bake for 1 hour. That’s it, super simple!

*I couldn't find the link to Barbara's Bakery mashed potato flakes so I wrote a letter to the company and found out that they have been discontinued. Here is the company's response:
Thanks for your email. Unfortunately, we have discontinued our Barbara's Mashed Potatoes product due to a prolonged period of disappointing sales and ongoing production issues. We all loved this product, as did many of our valued consumers, and we are disappointed that we had to finally discontinue it.
Paradise Valley brand all natural mashed potatoes has been recommended by some of our staff members. Another source for all natural potatoes only is Barry Farm Foods (www.barryfarm.com), located in Ohio; this source was recommended by another consumer of our potatoes and does have online purchasing. We hope you find this source useful as an alternative to our discontinued brand.

Thursday, October 2, 2008

Zucchini Bread

I have always thought of zuchini bread as a fall food, so I've been holding on to this recipe. My mother told me the other day, however, that zuchini season is almost over. I guess living in central Oregon keeps me a little out of touch with "normal" growing seasons. This is basically the same recipe as my banana bread. It is gluten free, egg free, dairy free, and nut free. As bread goes it is a little sweet (maybe more like a snack cake)...but how else am I going to get these kids of mine to eat zuchini? ;)

½ c Brown rice flour
½ c Sorghum flour
½ c Potato starch
¼ c Tapioca starch
2 t Baking powder
½ t Salt
1 t Cinnamon
1 t Xanthan gum
1/3 c Dairy free margarine, softened (or Spectrum shortening)
3/4 c Brown sugar
1 T EnerG egg replacer mixed with ¼ c warm water (equal to 2 eggs)
1 c Grated zucchini
½ c Mashed pears (baby food works great, so does applesauce if you don’t have pears on hand)
1 t Vanilla extract

Preheat oven to 350 degrees. Grease an 8”x4” loaf pan.
Measure all of the dry ingredients (the first 9 ingredients) into a bowl and blend well with a whisk. Set aside.

In a mixing bowl cream together margarine and brown sugar. Add prepared egg replacer, zucchini, pears, and vanilla. Mix to combine. Slowly stir in dry ingredients, scraping down sides of bowl, until fully incorporated. Beat on medium speed for another minute.

Pour batter into greased loaf pan and smooth the top if needed ( a metal spoon dipped in water will smooth it without sticking to it). Bake for one hour or until golden brown and a toothpick inserted in the middle comes out with crumbs instead of goop.

Allow to cool in pan for 10 minutes. Remove from pan and continue to cool on a rack.
You will need to cool this bread pretty thoroughly before you slice it, but of course you do have to try a piece slightly warm with melted margarine on it. As for the rest of the loaf (if any makes it to the next day), it is moist and sweet and delicious cold and straight out of the bag the next day and for several days after.