I am reviewing a new cookbook this week, The Allergy Free Cook Bakes Bread. It is available
HERE on Amazon for only $11.54! If you are new to gluten free cooking this book will be a lifesaver. When I first started this allergen free endeaver, (oh gosh, has it been 10 years ago already?), I bought an allergy cookbookbook that had a comprehensive list of gluten free flours and their properties and I could not have ever come this far without it. The problem is that there are more flours available now than there were 10 years ago, so many of the new flours were not included in my first book. The allergy Free Cook Bakes Bread not only has an extensive list of flours, but also a wonderful guide to dairy replacements, and egg replacements! I really do believe this is a m

ust-have book! Now, as I have been writing this my Chocolate Chip Scones from this book have been baking. In the time it took for me to take and upload a picture...they are gone! In other words, I would buy this book just for the information it provides, but as a bonus the recipes are amazing too! :) Included are recipes for quick breads, yeast breads, scones, tortillas, bagels, focaccia, and more. I want to thank Laurie Sadowski for sending me a copy of this book!!! I let Emily decide which recipe we should make first and review, and this was her choice:
CHOCOLATE CHIP SCONES:
1/2 c Sorghum flour
1/4 c Quinoa flour (we subbed with millet)
1/4 c Tapioca starch
2 T Sugar
1 1/4 t Baking Powder
1/4 t Baking soda
1/2 t Xanthan gum
1/8 t Sea salt
3 T Dairy free margarine
1/3 c Enjoy Life chocolate chips
5 T Soy milk (or other milk alternative)
1 T Cider vinegar
Preheat oven to 400 degrees. Line a baking sheet with parchment paper.
Mix together soy milk and vinegar. Set aside.
Put the sorghum flour, quinoa flour, tapioca starch, sugar, baking powder, baking soda, xanthan gum, and salt in a large bowl. Stir with a dry whisk until combined. Using a pastry cutter or two knives (or mashing with a whisk like I do), cut in the margarine until the mixture resembles coarse crumbs. Stir in the chocolate chips.
Pour 1/4 cup of the soy milk and vinegar mixture (vegan buttermilk, for which the recipe is also in this book) into the flour mixture to make a dough and stir until just moistened, add the rest if needed. Using floured hands, gather the dough into a cohesive ball and transfer to the lined baking sheet. Gently knead dough 2 or 3 times until it holds together. Pat into a 1/2" thick circle. (At this point I sprinkled a little sugar on top because we like sweet.) Using a floured knife cut the dough into 4 wedges, pulling them apart only slightly.
Bake 15 to 18 minutes, until lightly browned. Transfer to a cooling rack and let cool for at least 5 minutes. Serve warm. ( Ours were definitly served warm, the house smelled like chocolate chip cookies and the kids came running!)
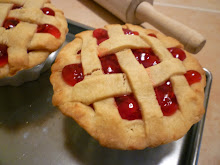
 I had not planned to post this, it was an afterthought really. The rest of the family is having cheesecake for dessert on Thanksgiving and Emily asked for cherry pie. I was already using my 9" pie pan for the cheesecake, so we made her two mini pies in small ramekins. Again, I wasn't going to mention the pies here, but when we finished making them I stepped back and looked at them...they were adorable! They were so beautiful I HAD to get a picture! Then of course I thought "I have a picture, I might as well post it". The picture doesn't do them justice though. Maybe the holidays are making me overly emotional, but these doggone things were so cute I almost cried!