Thursday, June 14, 2012
Enjoy Life's Fabulous New Snack: Plentils
Thursday, May 3, 2012
Crock Pot BBQ Pulled Pork (Gluten Free) and Vegan Coleslaw

BBQ PULLED PORK:
2 to 3 lbs Boneless pork (preferably the “dark meat”, we used boneless country style ribs)
½ c Allergy safe chicken broth
½ c Sweet Baby Ray’s original BBQ sauce (it is gluten free!)
½ t Wright’s All Natural Hickory Seasoning Liquid Smoke (also gluten free!)
Pour broth, BBQ sauce, and liquid smoke into the crock pot and mix well. Add your meat and flip it around a little bit until it is coated with the sauce. Cook on low for 8 hours. Remove cover and use two forks to pull and shred the meat. Stir the shredded meat and sauce together. If the sauce is too watery, leave the lid off, turn the crock pot up to high, and cook for another 15 minutes or so, stirring occasionally, until it reaches your desired consistency.
Serve as sandwiches or as a main course, it's also very good over rice!
VEGAN COLESLAW:
1 Small head of cabbage, shredded
3 Medium carrots, shredded
1 c Vegenaise
1/4 c Sugar
1/4 c Cider vinegar
1/2 t Celery seeds
1/2 t Onion powder
Put cabbage and carrots in a large bowl. In a separate bowl mix remaining ingredients until sugar is dissolved. Pour the dressing over the cabbage and carrots and mix well. Refrigerate for an hour or so to let the flavors combine. Salt and pepper to taste.
Another thought (I've never tried this, but I've seen it on TV), you might want to pile your sandwich up with BOTH pulled pork AND coleslaw...they say it's really good. :)
Saturday, March 31, 2012
Surf Sweets Spring Mix Jelly Bean Scones
 You are looking at the Grand Prize Winner of the Surf Sweets Jelly Bean Blogger Bake-Off! Can you believe it??? I'm still in shock. The Surf Sweets organic candy company invited 16 food allergy bloggers to enter their organic (and allergen free) jelly bean bake off, and they got 16 amazing enteries...just in time for Easter! Following is my recipe for Surf Sweets Spring Mix Jelly Bean Scones. If you would like to see the other delicious entries, you will find them at http://www.surfsweets.com/imgs/contestwinners.pdf
SCONES:
5 T Milk alternative: rice, hemp, coconut, sunflower, etc. (safe for your allergies)
1/2 c Sorghum flour
1/4 c Millet flour
1/4 c Tapioca starch
2 T Sugar
1 1/4 t Baking Powder
1/4 t Baking soda
1/2 t Xanthan gum
1/8 t Salt
3 T Spectrum shortening
1/2 c Surf Sweets Spring Mix of Organic Jelly Beans
1/2 t Vanilla extract (make sure it’s gluten free)
1. Preheat oven to 400 degrees. Line a baking sheet with parchment paper.
2. Mix together milk alternative and lemon juice to create a “buttermilk” . Set aside.
3. Put the sorghum flour, millet flour, tapioca starch, sugar, baking powder, baking soda, xanthan gum, salt, and lemon zest in a large bowl. Stir with a dry whisk until combined. Using a pastry cutter, two knives, or mashing with a whisk, cut in the margarine until the mixture resembles coarse crumbs. Stir in the Surf Sweets Organic Jelly Beans.Add vanilla extract to milk alternative and lemon juice. Pour 1/4 cup of this “buttermilk” mix into the dry ingredients to make a dough. Stir until just moistened, add the rest of the liquid if needed. Gently knead dough 2 or 3 times until it holds together.
4. Using millet or sorghum floured hands, gather the dough into a cohesive ball and transfer to the lined baking sheet. Pat into a 1/2" thick circle. Using a floured knife, cut the dough into 4 wedges, pulling them apart slightly.
5. Bake 15 minutes, until lightly browned. Transfer to a cooling rack and let cool for at least 5 minutes.
ICING:
1 T Milk alternative (or water)
1 c Powdered sugar
1/2 t Vanilla extract (make sure it’s gluten free)
Mix liquids and powdered sugar together until smooth. Apply a generous layer to the tops of scones.
DECORATION: Use leftover Surf Sweets Jelly Beans to press into the icing and decorate in any way desired! (We cut our Jelly beans in half lengthwise so that they would stay on better.)
Saturday, February 4, 2012
The Healthy Gluten-Free Life: Book Review and a Delicious Recipe for Ginger Lime Chicken Bites
 I tried to put a link to the book here, but it's not working. If you would like to order The Healthy Gluten-Free Life online through Amazon at a discount you can use my link in my "Amazon Favorites", just look to the right of this post and scroll down (or up) a little bit as needed. It is also available through Barnes and Noble. I know I have given good reviews to cookbooks before, but this one I have been waiting for with great anticipation! The Celiac Maniac was a local bakery that made gluten free/vegan goodies, and their english muffins were outstanding. Unfortunately they had to go out of business, but there is a silver lining. Tammy Credicott (the wife of "The Maniac") wrote this cookbook, The Healthy Gluten-Free Life ...and the english muffin recipe is in it! I asked Tammy if I could post a recipe from the book and she said yes, so of course I knew exactly which one I was going to post (yes, the english muffins!). Then she brought me the book. I started looking through it and, oh my goodness, EVERYTHING looked so good! This is a thick book, full of beautiful color photographs. It contains 200 recipes for breakfasts, main dishes, side dishes, sauces and dressings, lots of yummy baked goods, and drinks. All of the recipes are gluten free, dairy free, and egg free. There are a few recipes with soy and/or nuts, but for the most part they are easily omitted, and when they can't be omitted Tammy gives suggestions for substitutions. The first 43 pages are full of stories, guidance, and lots of essential information including a wonderfully simple guide to the textures and flavors of gluten free flours, egg and dairy replacements, and nutritional info on the foods we cook with. This is a great book for anyone just starting on the allergen free journey and for those of us who still want to learn more. Well, after reading through this book cover to cover, and looking at all of these mouth watering pictures, I came to a decision...you will have to buy the book for the English muffin recipe and all the other great recipes in it...I had to make the Ginger Lime Chicken Bites first. The picture in the book kept calling to me (on that note, sorry my picture is so dark, I had lighting issues). We served our chicken bites over Thai Kitchen Stir-Fry Rice Noodles. It was everything I had hoped for, Emily and I gobbled it up and it was soooo good!!! So without further adieu, here is the recipe:
GINGER LIME CHICKEN BITES:

CHICKEN:
1 T Coconut oil
3 Boneless skinless chicken breasts, cut into bite size pieces
SAUCE:
Juice from one organic lime
2 T Bragg liquid aminos (or San-J wheat free soy sauce or Coconut Secret coconut aminos, also available through my "Amazon Favorites" at right)
1 T Olive oil
1t Freshly grated ginger
1 Garlic clove, minced
1 T Raw organic honey
1 t Granulated onion
TOPPING:
Chopped green onions
Sesame seeds
1. Mix sauce ingredients in a small bowl and set aside.
2. Heat oil in a large skillet over medium-high heat. Add chicken. Cook chicken, stirring occasionally, until browned and almost done. About 5 minutes.
3.Add sauce to skillet, turn heat to low, and simmer, uncovered, for another 5 minutes, or until chicken pieces are cooked through.
4. Serve with rice or rice noodles, if desired. Top chicken bites with chopped green onions and sesame seeds. Enjoy!
Sunday, January 29, 2012
Not Nuts Seed and Fruit Mixes-YUM!
OK, so, I am borrowing pictures from the Ejoy Life website because I wasn't able to get a picture of my Not Nuts fruit and seed mixes before they were ripped open and eaten up. Not Nuts has been around for a while, but their packaging recently received a makover-this is what the colorful new bags look like. I almost felt guilty receiving free samples of the Not Nuts mixes for my review, because I not only have already tried them, but I buy them all the time. We LOVE them! The girls, my mother, and I took a trip to San Francisco last summer and we practically lived on these between meals. I never travel without them! These "trail mixes" are made in a dedicated nut and gluten free facility. They are free of all of the top 8 allergens, they are also free of casein, potato, and sesame, and they contain no sulfites!!! Amazing stuff :)
There are two flavors:

Beach Bash is made with Raw Sunflower Kernels, Dried Pineapple, Roasted Hulled Pumpkin Seeds (Sunflower Oil, Citric Acid, Salt), Dried Cranberries, and Dried Apricots. Beach Bash is my favorite!

There are two flavors:

Beach Bash is made with Raw Sunflower Kernels, Dried Pineapple, Roasted Hulled Pumpkin Seeds (Sunflower Oil, Citric Acid, Salt), Dried Cranberries, and Dried Apricots. Beach Bash is my favorite!

Mountain Mambo is made with Raw Sunflower Kernels, Roasted Hulled Pumpkin Seeds (Sunflower Oil , Citric Acid, Salt), Raisins, Dried Apples, Chocolate Chips (Evaporated Cane Juice, Chocolate Liquor, Non-Dairy Cocoa Butter), and Dried Cranberries. Mountain Mambo is the favorite of both my girls, of course they always go for the chocolate chips.
I highly recommend keeping a bag in your purse and one in the car for those snack attacks and little food emergencies.
Friday, January 6, 2012
Enjoy Life's Crunchy Cookie Collection
 First of all I need to apologize to the wonderful people at Enjoy life, they sent these cookies for me to review a month ago, and I am just now getting around to it. The cookies were delicious, so sadly all I have left to take a picture of are empty boxes. Now I have mentioned many times before that I am not a crunchy cookie kind of girl. For this reason I tried to get my girls to head up this review for me, but all I could get out of them is " I don't know, they're all so good!" It's speaks highly of the cookies, but not very descriptive. So, at this point, I decided to try them myself.
When I did get around to trying them the
Double Chocolate Cookie and the Chocolate Chip Cookies were already gone. I assume this either means that these were the preferred flavors or that my kids are chocoholics (highly possible). I tried the two that were left. My favorite of these two was the Sugar Crisp, although the Vanilla Honey Graham would be PERFECT for making s'mores. Texturally I can tell these are a gluten free cookies, they do have that slight tell tale grittiness, but if you are used to eating gluten free you won't even notice it. The flavors, however, are amazing! With many allergen free cookies all you taste is sugar. The new Enjoy Life Crunchy Cookies have wonderfully full and complex flavors. Even the sugar cookie didn't just taste sweet...it tasted like a sugar cookie. All four flavors were definitely a thumbs up. We also discovered that any one of these cookies makes an awesome "ice cream" sandwich!
I am so glad to see that Enjoy Life seems to be blossoming as a company. I have seen a few good allergen free companies come and go in recent years. Enjoy life is still expanding, and I am even finding it in my less expensive everyday grocery stores now. How great is it not to have to travel 15 miles out of your way to pick up a box of chocolate chips cookies, or worse yet pay double what they're worth in shipping charges?! To the Enjoy Life company...Thank you for this opportunity to review your products and I hope to see more and more from you in many years to come! :)
Friday, December 9, 2011
Egg Free Royal Icing
 As usual, I have no time to make or post anything new, but I thought at the very least I could re-post my egg free royal icing recipe. I don't think I could live without it this time of year. I hope it comes in handy for others in need too. I hope you all are having a very, very wonderful holiday season!!! :)
 And here's the recipe...
1 c Powdered sugar
1 T Ener-G egg replacer (dry)
1 t Cream of tartar
1/8 t Xanthan gum
2 T Water (approximately)
Blend all dry ingredients together. Add water slowly until desired consistency is reached. Less water will be strong enough to bind gingerbread houses, more water will be better for a piping bag.
Wednesday, November 23, 2011
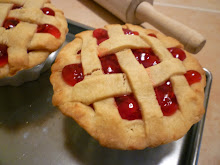
Mini Cherry Pies: Gluten Free and Vegan
 I had not planned to post this, it was an afterthought really. The rest of the family is having cheesecake for dessert on Thanksgiving and Emily asked for cherry pie. I was already using my 9" pie pan for the cheesecake, so we made her two mini pies in small ramekins. Again, I wasn't going to mention the pies here, but when we finished making them I stepped back and looked at them...they were adorable! They were so beautiful I HAD to get a picture! Then of course I thought "I have a picture, I might as well post it". The picture doesn't do them justice though. Maybe the holidays are making me overly emotional, but these doggone things were so cute I almost cried!
NOT SO MUCH A RECIPE, BUT HERE YA' GO:
1 batch of pie crust, mine is here
http://yummyallergenfree.blogspot.com/search/label/pumpkin%20pie
1 can of allergy safe cherry pie filling
Preheat oven to 350 degrees. Press your pie crust evenly into the ramekins. If you have any leftover crust you can cut designs for the top. This was my first ever lattice top...maybe THAT'S why I was so proud!(?) Fill crusts to 1/2" below the top. Crimp or decorate the tops as desired. Place ramekins on a cookie sheet in case your filling boils over. Bake until tops are golden. My pies have all varied from 50 minutes to one hour. These ones baked for 55 minutes.
I hope you all have a truly beautiful Thankgiving full of family, friends, and fabulous foods!!!
Wednesday, November 16, 2011
Enjoy Life Mega Chunks and Banana Oatmeal Mega Chunk Cookies
 I was so excited when I heard about Enjoy Life's new Mega Chunks, but then I couldn't find them in my local store. Then Enjoy Life contacted me and asked if I would like to review them and I said oh yes, yes! For the record, they also sent me a bag of their new chocolate granola to review. It tastes wonderful! I've always enjoyed the flavors of Enjoy Life granolas, but I have a problem with the texture. I am not a crunchy person, and they are definitely harder than oat based granolas. However, if you are the kind of person who loves snacking on corn nuts, like my mother, then you should definitely give it a try. Now back to the Mega Chunks. They are wonderful little chocolate chunks, about the size of half a Tootsie Roll, and have so much potential that I had a hard time deciding what to do with them first (besides eating them straight out of the bag, which we also did). Remember, they are free of all top 8 allergens, Kosher, and have no trans fats or artificial ingredients...not to mention delicious! Meanwhile, I had a brown banana calling my name and two girls in need of cookies, so was born the banana oatmeal chocolate chunk cookie. :)
BANANA OATMEAL MEGA CHUNK COOKIES:
1/2 c Gluten free oat flour
1/2 c Sorghum flour
1/8 c Potato starch
1/8 c Tapioca starch
1/4 t Xanthan gum
1/2 t Baking soda
1 t Salt
1 t Cinnamon
3/4 c Dairy free margarine (or Spectrum Shortening for soy free)
1 c Brown sugar
1 1/2 c Pureed bananas
1 t Gluten Free vanilla extract
3 c Gluten free rolled oats
About 20 -25 pieces of Enjoy Life Mega Chunks
Preheat oven to 350 degrees. Lay parchment paper on a cookie sheet.
Whisk together oat flour, sorghum flour, potato starch, tapioca starch, xanthan gum, baking soda, salt, and cinnamon, and set aside. Cream together margarine and brown sugar. Add vanilla and banana. Mix well, scraping sides and bottom of bowl to make sure all margarine is incorporated. Blend in the flour mix. Add oats, and stir for 1 more minute.
Drop cookies on parchment lined cookie sheet by large tablespoons (or using a small spring action ice cream scoop like I did). Press one Mega Chunk deep into the center of each cookie (they tend to rise back out a bit when baking).
Bake for 8 to 10 minutes. Allow to cool for about 5 minutes before transferring to a cooling rack. The chocolate chunks take about an hour to harden back up, so if you are going to be stacking your cookies for storage, you may want to refrigerate them for a few minutes first.
These cookies were really delicious, and possibly bordering on healthy. I can't wait to try another recipe with this chocolate...maybe the blondie recipe on the back of the bag. Yum!
Sunday, November 6, 2011
"The Allergy Free Cook Bakes Bread" Gluten Free, Egg Free, and Dairy Free! by Laurie Sadowski
 I am reviewing a new cookbook this week, The Allergy Free Cook Bakes Bread. It is available HERE on Amazon for only $11.54! If you are new to gluten free cooking this book will be a lifesaver. When I first started this allergen free endeaver, (oh gosh, has it been 10 years ago already?), I bought an allergy cookbookbook that had a comprehensive list of gluten free flours and their properties and I could not have ever come this far without it. The problem is that there are more flours available now than there were 10 years ago, so many of the new flours were not included in my first book. The allergy Free Cook Bakes Bread not only has an extensive list of flours, but also a wonderful guide to dairy replacements, and egg replacements! I really do believe this is a m
 ust-have book! Now, as I have been writing this my Chocolate Chip Scones from this book have been baking. In the time it took for me to take and upload a picture...they are gone! In other words, I would buy this book just for the information it provides, but as a bonus the recipes are amazing too! :) Included are recipes for quick breads, yeast breads, scones, tortillas, bagels, focaccia, and more. I want to thank Laurie Sadowski for sending me a copy of this book!!! I let Emily decide which recipe we should make first and review, and this was her choice:
CHOCOLATE CHIP SCONES:
1/2 c Sorghum flour
1/4 c Quinoa flour (we subbed with millet)
1/4 c Tapioca starch
2 T Sugar
1 1/4 t Baking Powder
1/4 t Baking soda
1/2 t Xanthan gum
1/8 t Sea salt
3 T Dairy free margarine
1/3 c Enjoy Life chocolate chips
5 T Soy milk (or other milk alternative)
1 T Cider vinegar
Preheat oven to 400 degrees. Line a baking sheet with parchment paper.
Mix together soy milk and vinegar. Set aside.
Put the sorghum flour, quinoa flour, tapioca starch, sugar, baking powder, baking soda, xanthan gum, and salt in a large bowl. Stir with a dry whisk until combined. Using a pastry cutter or two knives (or mashing with a whisk like I do), cut in the margarine until the mixture resembles coarse crumbs. Stir in the chocolate chips.
Pour 1/4 cup of the soy milk and vinegar mixture (vegan buttermilk, for which the recipe is also in this book) into the flour mixture to make a dough and stir until just moistened, add the rest if needed. Using floured hands, gather the dough into a cohesive ball and transfer to the lined baking sheet. Gently knead dough 2 or 3 times until it holds together. Pat into a 1/2" thick circle. (At this point I sprinkled a little sugar on top because we like sweet.) Using a floured knife cut the dough into 4 wedges, pulling them apart only slightly.
Bake 15 to 18 minutes, until lightly browned. Transfer to a cooling rack and let cool for at least 5 minutes. Serve warm. ( Ours were definitly served warm, the house smelled like chocolate chip cookies and the kids came running!)
Thursday, October 20, 2011
"Lunch Box" Gluten Free Apple Pies
 I thought these would make great little take-along pies for Emily's school lunches, that was the plan anyway.I guess I didn't really think it through, because we made them on Friday and the recipe only made five pies, so of course by Monday when I went to pack her lunch they were all gone. Oh well, at least I know they were good! By the way, if anyone knows the name for this type of pie (mini, with the filling enclosed in crust) please tell me. I know that they have a name which is escaping me and it's driving me crazy!
CRUST:
1/3 c plus 1 T Chilled vegetable shortening
1/4 c Rice flour
1/4 c Sorghum flour
1/4 c Potato starch
1/8 c Sweet rice flour
1/8 c Tapioca starch
1 1/2 t Dry Ener-G egg replacer
1/4 t Salt
2 t Sugar
2 to 3 T Ice water
In a large bowl with a wire whisk blend all dry ingredients. Cut in vegetable shortening until particles are the size of small peas (most recipes say to use a pastry cutter or two knives, I actually use my whisk in a potato masher sort of way, alternating between stirring and mashing until the desired consistancy is reached). Sprinkle in water, 1 tablespoon at a time, tossing with fork until all flour is moistened and pastry dough holds together when shaped into a ball with hands (1 to 2 teaspoons additional water can be added if necessary). Flatten into a rectangle and chill dough for at least an hour.
FILLING:
2 c Thinly siced apples (about 2 med. apples)
1/2 c Water
1 T Lemon juice
2 T Brown sugar
1/2 t Cinnamon
1 or 2 dashes of Nutmeg
Stir all the ingredients together in a medium saucepan. Bring to a boil. Reduce heat to medium and cook, stirring occasionally, until the apples are tender-crisp and the liquid has reduced to a syrupy coating. let the apples cool before handling them.
ASSEMBLY:
I guess I should have taken pictures, but I think it's pretty easy to understand. Take the dough out and allow it to rest at room temperature for a few minutes. Roll it into a rectangle 40"x 20", using sweet rice flour for dusting if necessary. Cut into 10 rectangles, each 4"x 2".
Line a baking pan with parchment paper.
For each pie, lay one rectangle on the parchment paper. Then lay a mound of apple filling down the center, leaving acout 1/4" of crust open around the entire perimeter. Lay another rectangle of crust on top, lining up the edges, stretching a little if needed. If dough tears, it can be mended with a little pinching (if it won't stick, wet your fingers with a little water). Crimp all around the outside edges with a fork or crimping tool. Try to keep the thickness of the crimped edges about the same as the original thickness of the crust, in other words, around the edges the two layers should now be pressed to the same thickness as one layer would be. If you make it too thin the edges will burn.
TOPPING: (optional)
Brush tops of pies with a very thin mix of powdered sugar and water. Sprinkle lightly with cinnamon sugar.
BAKE:
Preheat oven to 350. Cut slits or designs into the top of each pie. Bake approximately 50 minutes. I checked mine at 45 minutes and they were not done. I cooked them for 60 minutes and they were a little crunchier than I would have liked. So, I'm thinking 50 minutes is a good time, but I haven't tried it yet. When I get around to making these again I will come back and revise this part.
Well, there you have it. Happy Snacking!
Saturday, September 24, 2011
Human Rumination Syndrome
This isn't really a formal post. It has just occured to me that I need help and information, and I have this forum to put my plea out into the world wide web, and I have found myself with a few minutes to write. I posted a while back about my daughter Amanda and her diagnoses of Eosinophilic Esophagitis. We now think the EE is actually a reaction to the fact that she is constantly regurgitating. Every single day she gets up and has something to eat, then as soon as she is done eating, and continuously for the rest of the day, her food comes back up one small mouthful at a time. She simply swallows it back down and goes about her day, it is so constant that there really is no other option. Also, every time she eats, her stomach gets hard and swollen, but she showes no outward signs of having gas. We finally ended up at a GI who looked at her multitude of tests for her tummy troubles and said "I've been doing this for 15 years and I've never seen this before, I'm sorry, I don't know what to tell you". Huh??? We need answers!!! So, we went online and started Googling all of her symptoms, and WE found the answer. She has Human Rumination Syndrome. Unfortunately it is a "syndrome" and not a disease, so no pill or quick fix. We found a biofeedback breathing technique here http://www.healingbridge.com/articles/articles-biofeedback.htm that actually seems to help keep her food down but it's almost impossible to do as constantly as she needs to and still live a normal life, and when I tried to make an appointment with them they said they don't deal in her condition and refused us.
I doubt that any of my regular readers know anything about this condition, but again it is my hope that by putting this on the internet maybe someone out there who is just searching key words will see this and have some information, or input, or ANYTHING. It can't hurt to try. Right? I welcome any comments, thoughts, suggestions, and stories. Thank you!
For my regular readers, I really do plan to start posting more recipes again soon...I really do! :)
Friday, July 1, 2011
Lemon Poppy Seed Muffins-Gluten Free, Dairy Free, and Egg Free
 Well, we have probably all noticed that I don't seem to have time to create new recipes anymore, but I do find myself drawing on other great bloggers recipes from time to time. My daughter was craving lemon poppy seed muffins recently and in searching for a gluten free version I discovered Nicole at Gluten Free On A Shoestring, and I am so glad I did! Here is the link to her recipe for GF muffins (which do contain dairy and eggs) http://glutenfreeonashoestring.com/lemon-poppyseed-muffin-love . Nicole uses a flour blend called Better Batter which I am planning to try in the near future. I didn't have any flour blends on hand so I used one of my usual combos, but there are so many blends out there right now, and you can certainly substitute 2 cups of your favorite blend for the first 5 ingredients in my recipe (also leave out the xanthan gum if your blend already contains it). These muffins are incredible, even without eggs and dairy!
 ½ c Rice flour
½ c Sorghum flour
½ c Millet flour
¼ c Tapioca starch
¼ c Potato starch
1 t Xanthan gum
1 t Baking powder
1/2 t Baking soda
¼ t Salt
Zest of 1 lemon
2 T Poppy seeds
½ c Dairy free margarine
¾ c Sugar
2 Eggs worth of egg replacer
1 c Soy yogurt (I used half lemon and half vanilla)
½ t Vanilla extract
Juice of 1 lemon
Line 12 muffin cups with paper liners. Preheat the oven to 350 degrees.
In a medium sized bowl, place the flours, xanthan gum, baking powder, baking soda, salt, lemon zest and poppy seeds, and mix to combine. These are the dry ingredients. You want the lemon zest and poppy seeds to be coated in dry ingredients so they don’t clump together in the batter. Set the bowl aside.
In a large bowl, cream together the margarine and sugar until fluffy and light in color. Add the egg replacer, soy yogurt, vanilla extract, and lemon juice, beating well to combine after each addition. Add the dry ingredients to the wet mixture, and beat well until the batter becomes thicker and a bit more elastic.
Divide the batter evenly among the 12 cups of the muffin tin. Place the muffin tin in the center of the preheated oven, and bake for 25 minutes, or until a toothpick inserted into the center of a muffin comes out clean.
We also drizzled a little icing over ours, made from powdered sugar and lemon juice.
 Enjoy!
Tuesday, May 3, 2011
Kelapo Virgin Coconut Oil and Gluten Free Vegan Almond Cookies
 I have decided in this post to do a review and a recipe at the same time. I was sent a jar of Kelapo Cold Pressed Virgin Coconut Oil, and I have been having so much fun with it that I didn't know where to start. Coconut oil has many health benefits which you can read about by following the link below. The most relevant health benefit here, however, is that it is a dairy free, soy free baking alternative! Now I know some people don't like the taste of coconut. In the almond cookie recipe below you really can't taste it. For those of us who DO like coconut, I have to tell you, I tried spreading it on toast like the company suggests and it was amazing! The first thing you taste is coconut, then after a few seconds I swear it tastes and feels like butter on your tongue. Tonight we are going to try melting it and pouring it over popcorn. Oh yes, and I've been cooking my stir fry and root veggie casserole in it too, this really is wonderful stuff! Thank you to Jen over at the Kelapo company for introducing me to a wonderful new baking alternative! I would also like to mention that this product is organic and fair trade certified. I am having trouble with my integrated links, so please follow the link below to find out everything you want to know about Kelapo Coconut Oil http://www.kelapo.com/index.php.
 On to the recipe...I'll keep this short, but I have to mention why I made these. When I was a little girl my Grandma would occasionally bring home a little pink bakery box with fresh baked Chinese almond cookies inside. They were so amazing! I recently felt an overwhelming desire to share this with my kids, so I altered a recipe to be gluten free, egg free, dairy free, and soy free. Guess what...they didn't even like them! Silly kids!!! Anyway, despite what the kids may say I think these are incredible. I ate the whole batch! :)
1 c Kelapo Virgin Coconut Oil (please see link above)
3/4 c Sugar
1 Eggs worth of Ener G Egg replacer
1 t Gluten free almond extract
1 c Almond flour
3/4 c Brown rice flour
3/4 c Sorghum flour
1/8 c Potato starch
1/8 c Tapioca starch
1/2 t Xanthan gum
1 t Baking powder
1/4 t Salt
24 Whole blanched almonds
Optional: 2 parts corn syrup to 1 part water to be used as an "egg wash"
Heat oven to 350°F. Combine Kelapo Coconut Oil and sugar in large bowl. Beat at medium speed, scraping bowl often, until creamy. Add egg replacer and almond extract; beat until well mixed. Add flours, starches, baking powder and salt. Beat until well mixed. If dough is too dry and crumbly, add a teaspoon of water at a time until it JUST comes together. If you add too much water your cookies will be like marzipan in the middle (believe me- I know). Bake for 15 minutes or until just set. Cool completely.
Shape dough into 1 1/4-inch balls. Place 2 inches apart onto ungreased cookie sheet. Flatten to about ½ an inch thick. Press an almond into the center of each cookie.
Optional: If you want to mimic the look of egg wash, mix 2 parts corn syrup with 1 part water in small bowl, then brush tops of cookies with the mixture before baking.
Wednesday, April 20, 2011
Peach Cobbler, Gluten Free and Vegan

 This is my Aunt Jamie's beloved peach cobbler recipe from my childhood (with a few alterations of course). The last time I spoke to her she said "it's called Poor Man's Cobbler", and I said "no, it's called Aunt Jamie's Cobbler, it says so right here in my cookbook." :)
I have been playing with different flour blends and am still perfecting it, but I have found it's better to go very light on the starches. I hope this cobbler makes you feel as happy on the inside as it does me!
1/2 c Margarine
1 c Sugar
1 c Soy milk
1 c Gluten free flour blend
1 t Salt
1 1/2 t Baking powder
1 Pinch of baking soda
1/2 t Cinnamon
1 Quart canned peaches (or other desired fruit)- drained
Preheat oven to 350. Put the margarine into a medium sized casserole dish and place it in the preheating oven to melt.
Mix together the sugar, soy milk, flour blend, salt, baking powder, baking soda, and cinnamon.
Once the margarine is melted, remove dish from the oven and pour in half of the batter. Pour in the peaches, then pour the remaining batter over that.
Bake for 1 to 1 1/2 hours, until dough rises up to cover the peaches and is golden brown. (Depending on what your specific gluten free flour blend is, it may not turn golden brown, but it will look dry on top and will be fluffed up over the peaches).
Thursday, March 24, 2011
Eosinophilic Esophagitis and More Food Allergies
 I know I haven't posted for a while, life has been busy, but as you can see we have new developments. I have always said that my oldest daughter, Amanda, has the fewest allergies...funny thing is, we had never had her tested.
So, lets start at the beginning. For over a year now, my 17 year old has been having tummy troubles, but she didn't tell me until about 5 months ago when it started getting really bad. Every single day she would get up and have something to eat, then as soon as she was done eating, and continuously for the rest of the day, her food would come back up one small mouthful at a time. She would simply swallow it back down and go about her day, it was so constant that there really was no other option. The doctors started ordering one test after another. Of course they all wanted to call it GERD, but there is no acid coming up, just food. One of the tests showed some bile pooling in her stomach, but the doctors didn't seem too worried about that. The biopsy showed EE, her eosinophilic count was over 60. Then we did the allergy test. The results... peanuts (which they weren't even supposed to test her for because of a family history of anaphylaxis), wheat, barley, dairy, soy, and beef. She cut all of these things out of her diet and for the first day she had no regurgitation. We were so excited, this was actually working!!! Every day following, however, her symptoms have returned. We have not yet figured out why. So this is where we are at in our journey. It's her journey really since she is an amazing young adult now, but of course I will always be here to love her and support her in any way I can. She has started a blog journaling her condition and the foods that she eats every day. She and her boyfriend eat out a lot and I've been really impressed so far with the options they have found and with the helpfulness of their servers at the restaurants. Her blog is http://myjourneytoahappytummy.blogspot.com/ . I may be biased, but I thinks she is an amazing writer and I am so very proud of her! I'm also very proud of how well she has been handling this whole thing. She inspires me :)
So, that's where we are now. I hope to be posting a peach cobbler recipe soon. Maybe, with this new inspiration, I will find the time and energy to start posting recipes more frequently again. Love and allergen free hugs to you all!
Saturday, December 25, 2010
Apple Pie Crisp
 Please forgive my absence. I haven't had much time for baking, let alone posting and taking pictures. This post, however, was done almost entirely by my daughters. Nikki wrote the recipe and baked the crisp and Amanda took the pictures and uploaded them for me. Thank you girls! We are calling this apple pie crisp because instead of my traditional crisp filling (which is simply sliced apples), it has a thick sweet apple pie filling. The crisp was eaten so fast that we had to make it twice before I had enough left to get a picture of one small piece! Enjoy!!!
Filling:8 cups (about 5 large) of granny smith apples
1/2 c Granulated sugar
2 T Tapioca starch
1/2 t Nutmeg
1/2 t Cinnamon
1 t Vanilla extract
1 t Lemon juice
Dash of salt
Pare and slice apples. Place in a large bowl. Add remaining ingredients and mix well, we used our fingers :) lay apples in the bottom of a medium baking dish.
Topping:
1 c Brown sugar
1 c Gluten free oats
1/2 c Gluten free oat flour
1/2 c Spectrum shortening
1/8 t Salt
Mash all of the topping ingredients together until there are no longer large lumps of shortening.
Sprinkle the topping over the apples. Bake at 375° for 30 minutes, or until the apples are tender.
Tuesday, November 2, 2010
Meals To Live
 I am very excited to have discovered the Meals To Live line of frozen foods! In their words, Meals To Live is "a strong advocate for diabetes prevention, healthy lifestyles, and proper nutrition". I was contacted by the company and asked if I would like some sample meals to review on my site...you know me, I never pass up free food. After I received the meals I was immediately contacted by Nisha who told me that they had accidentally sent me a "standard" sample pack which included meals with gluten, and she told me to throw them away. I greatly appreciate Nisha's diligence and attention to detail, many companies wouldn't have noticed or acted upon such a mistake. Of course I didn't throw them away because I myself don't have any allergies, so I gobbled them up! Now we come to my dilemma...six of the meals are gluten free, four are not, and one of the gluten free meals contains eggs and dairy...how do I present this to my allergy free readers? That's when I realized that many of you moms and dads are just like me, no allergies of your own but cooking for allergic kids. We need to eat too! These meals are amazingly like good wholesome home made food. They use top of the line ingredients and absolutely no fillers. They are packed with vitamins, high in protein and fiber, and low in fats and calories. Wonderful! I am told they retail for $3.99 to $4.99 which amazes me because of the quality of the foods used compared to most frozen meals already on the market. They are currently available at Ralph's, Walgreens, Rite-Aide and Food For Less. On to the review...
I am actually going to review the foods as a whole, then I will list which ones are allergen free. Every single meal was of incredible quality! The green beans were crisp like they were fresh steamed, the meats were real meat, and the sauces were minimal and delicious. My favorites were the Mexican style dishes, the spices and seasonings were very authentic. The first meal I tried was the white chicken burrito and it is still my favorite, it really tasted like something I would pay $10.00 for at a Mexican restaurant. It had quinoa and veggies inside with a nice green sauce on top. Emily's favorite was the sliced turkey with balsamic sauce and butternut squash. It was the perfect blend of sweet and tangy. The omelet with spinach and turkey sausage was impressive too, eggs don't always microwave well but this was really good ( I have to admit though, I cheated a little on this one and added some extra cheese). I will definitely be keeping a few of these meals on hand for those days when I spend so much time cooking for the kids that I forget to cook for myself. Following is a list of the current meals available and their allergen contents:
Gluten Free, Egg Free, Dairy Free, Soy Free, Nut Free: White Chicken Fajita, Sliced Turkey with Balsamic Sauce and Butternut Squash, Grilled White Chicken with Brown Rice Pilaf and Vegetables, Shrimp Jambalaya , and Grilled White Chicken with Roasted Red Potatoes and Green Beans
Gluten Free, Soy Free, Nut Free: Spinach Omelet with Turkey Sausage
The following items DO CONTAIN eggs, dairy, and wheat: Stacked Eggplant with Seasoned White Chicken (also contains pine nuts), and White Chicken Chili Relleno
The following items DO CONTAIN dairy, and wheat: Turkey Meatballs with Whole Wheat Spaghetti, and White Chicken Burrito with Green Sauce
IMPORTANT NOTE: I read each and every ingredient with my own eyes...which are not perfect and sometimes make mistakes. Please remember to always read labels and only trust yourself to know what is OK for you and your family! :)
Tuesday, October 19, 2010
And The Winner Is...
My youngest daughter has chosen the winner of our Lucy's cookies giveaway, and the winner is... Mommy Michel! Congratulations! Thank you to everyone who left a comment. I hope you will all still have a chance to try Lucy's at some point. By the way, Nikki and I discovered a new use for these cookies, ice cream sandwiches! They were so good!!! I wish I had a picture...but we ate them too quickly. Just scoop a little ice cream between two cookies, smoosh them together a little, wrap in foil, and freeze. YUM!
Tuesday, October 5, 2010
Lucy's Cookies Giveaway- Gluten Free, Egg Free, Dairy Free, and Nut Free!!!
 After receiving only a couple of responses to my last giveaway, I spoke to a few people and realized it was because so many of my readers simply couldn't eat the product due to multiple food allergies. That was when I decided to contact Lucy's Cookies and see if they would be interested in hosting a giveaway...and they said yes! Lucy's cookies are amazing!!! They are crunchy, which insures a much longer shelf life, the texture and taste are wonderful, they are easy to find (available at Starbucks...and you know how easy THEY are to find), and best of all every Lucy's cookie is certified free of gluten, eggs, dairy, tree nuts, and peanuts. In addition, these cookies contain no cholesterol and no trans fats, they include many organic ingredients, and they are vegan and Kosher certified.
Lucy's sent me a very generous variety of cookies to sample and review, and they are going to send this same package to one very lucky winner right here! This package includes one bag (3 or4 cookies) and one box ( about 16 cookies) of each of their four flavors: Chocolate Chip, Sugar Cookies, Oatmeal, and Cinnamon Thins.
I'm not really sure how to go about reviewing these cookies, they are all just so good. I have eaten half a box of Cinnamon Thins as I've been sitting here writing. We also discovered over the summer that the Cinnamon Thins are a great replacement for graham crackers when making s'mores! The general opinion in my house is that the Chocolate Chip are amazingly similar to Chips Ahoy. Nikki's favorite is the Oatmeal Cookie. My favorite is the Cinnamon Thin followed closely by the Sugar Cookie. They both taste very "eggy" and "buttery" to me which is very hard to do with no eggs or butter. The texture of all of these cookies is crunchy, but not too hard. The flavor is hard to describe, I want to make sure I do it justice. These cookies contain bean and oat flours so they actually have a hearty taste, not like some other gluten free options that taste like sugary air. It is a full and earthy flavor, but "earthy" in a good way and not bitter at all.
If you would like a chance to win this fabulous gift box, please leave me a comment below!!! Emily will be drawing the winning name from a hat on Monday, October 18th. In the mean time, next time you are in Starbucks you should definitely grab a bag and give them a try! Lucy's cookies are also available at Whole Foods and Amazon, which you will find a link to at the right of this page. Good luck to everyone! :)
Subscribe to:
Posts (Atom)